Archive for the ‘Carving’ Category

June Update

Once again my intention to keep a regularly updated blog falls flat on its face. I will at least try to keep a monthly update schedule for the rest of the year to encourage me to be a bit more productive in my free-time.

I’m close to finishing another term of soapstone carving. I will eventually get round to photographing my finished piece from last term at some point too. I’ll probably just talk about both terms at the same time so expect an update in 2 or 2 weeks once I’ve got my current piece finished up.

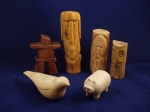
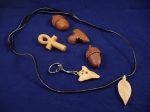
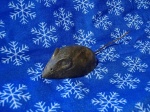
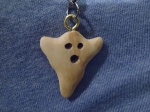
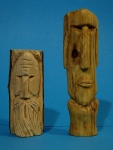
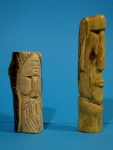
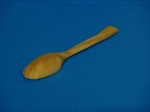
In terms of wood carving I’ve barely done anything new, although I did put together a little portfolio/presentation book for an exhibition put on by the craft group I attend. During that exhibition I also helped organise a funky foam printing activity, so that’s something else I could maybe write a little bit about in the future.

To make sure this post has at least some content I’ll share a few of the photos I took for my portfolio. I’m really struggling for carving ideas right now but I’ll try to start something new this week and talk about it here once I’ve made some progress. If all else fails I’ve got some interesting work related items that I could share.

Soapstone Class Update

My soapstone carving class is over halfway finished now. I have completed my first little project that I posted about previously and started on another slightly bigger project.

My first project was a simple little mouse, that’s all done now and the results are below.

After the previous update I finished smoothing and shaping the body, drilled two small eyes and added a tail made from a leather cord which is glued into a hole I drilled in the rear. The final finish was achieved with a few coats of linseed oil. This brought out a range of colours within the stone which was much broader than I had expected.

My next piece will be an Eider duck, I have made some progress in the roughing out of the basic shape but I still have a lot of work to do. I am not sure I’ll be able to finish it completely by the end of the course but I hope to re-enroll for next term.

EiderAt the encouragement of the tutor I made a clay maquette of my Eider to try to plan the basic shape and proportions. I don’t think I did a very good job of it. I have almost no experience in clay modelling so the shape was very rough and the shape and proportion of the head is more than a little bit off.

My next class will be spent focusing on doing the bulk of the shaping around the body and making a start with roughing out the head. If it comes out looking ok and if I can re-enroll next term I had thought about making a base for the Eider to rest on with a carved wake pattern to represent the duck moving through the water. I don’t know how well this project will turn out but I’m sure it will be a good learning experience.

The next update will be after the final class of the course.


Progress Report

It’s long since been established that I am really bad at updating this blog with any kind of regularity. I still haven’t changed this temporary layout over a year later, or made a logo. I’m slightly more productive at the work bench but not as much as I should be and I’m certainly not great at keeping a record of the things I’ve made.

One of the reasons I made this blog was to force myself to show people the things I make and to provide a record of my progress in the various things I do. I don’t really think I’ve been doing that so well so here is a direct comparison of something I made at least 2 years ago and something I made last week.

Brooches before and after

On the left is one of the first bird brooches I made and on the right is the latest. My latest attempt is still very simple and not very well detailed but the progression from my earlier attempt is clear. I think the overall shape is much nicer, it’s much more three-dimensional and I’ve attempted to give the bird a proper eye rather than just drilling a hole.

I think my drawing and design skills are still lacking somewhat but as far as the execution of my projects goes I feel I’m making some progress. I might do a similar post to show how my spoon making has progressed at some point too. I’d like to do one for carvings but I don’t think I’ve really done enough proper carving in the round for me to really do a worthwhile comparison. Increasing my output in that area so I can actually see if I’m making progress or not should be a goal of mine for this year.

Soapstone Class – Week 1

Last Friday I went to my first soapstone carving class.

Although I normally work in wood I thought taking this class would help me develop my carving skills on a material that is easy to work with and put me in an environment with other, much more capable, carvers that I could learn from.

I think calling the other members of the class “more capable” is something of an understatement. It’s only a small group but most of them have been taking the same class over and over for a few years and their work is nothing short of remarkable. It would be entirely appropriate to call them artists rather than simply carvers. There is a wide array of skills and styles on display from the other members of the class from abstract sculptures to animals to classical chinese style heads.

As you’ve probably seen, my work is a little more… unsophisticated. I probably won’t be making any terracotta warriors within the 8 weeks of the course but I’d like to come out of this with something simple and presentable.

I haven’t quite decided on my main project yet so I spent the first class working on something small using one of the free scraps among the supplies of stone (we pay for the stone by weight normally). It’s going to be a little mousey.

Image

I think I’m just about done with the basic shaping so the next class will be spent smoothing it off and maybe even applying a finish. When I’m done with the smoothing I’ll drill some little eye holes and another hole in the bum for me to stick some leather thong in to act as a tail.

I’m working on sketching some ideas for my main project so hopefully I’ll at least be able to pick out a stone this week and start some basic roughing out.

Catching up

As expected I’ve been completely useless when it comes to updating this blog. Thankfully I’ve not been so lax when it comes to actually making things.

I’ve made quite a few small pieces these last few months, mostly pendants and the like. Sadly I’ve passed a few onto people without photographing them. I remembered to take a couple of pictures though so I’ve at least got something to share.

First up is something inspired by a makezine article.

Crayon pendant

Embedding pencil crayons into a pendant seemed like an odd idea at first and I wasn’t sure it would work but I’m glad I tried it. I did most of the shaping and finishing of this pendant at a craft group I attend and it attracted quite a bit of attention while I was working on it. I eventually ended up selling it along with a couple of other items which I suppose was a nice surprise. I never make anything with a sale in mind but I suppose getting a few quid back for more materials is a plus.

Next up is a little pig I made out of some wood I found down by the river.

Pig

I think it might be Beech, I’m not sure. It carved pretty well though and took a wax finish quite nicely. It’s not a very detailed or lifelike pig, just a cute little thing that I made for fun.

Finally I have a spoon, made from the same wood as the pig.

Spoon

I’m actually quite pleased with this spoon. It’s the best one I’ve made to date. I’m still having trouble joining the handle and the underside of the bowl together neatly but that will come in time with a bit of studying and practice I hope.. I’ve since finished it off with a bit of walnut oil.

In the pipeline I’ve got another spoon, a little tiki carving and another crayon pendant. The pendant will be very similar to the previous one so I won’t bother posting it here but I think I’ll share the spoon and the tiki when they’re done.

Spooky Ghost Keyring

When autumn rolls rounds I tend to get a bit more productive in the garage so expect at least some updates over the coming months. I clearly haven’t managed to keep to my very low target of monthly entries but I’ve already got a couple of things in the pipeline so maybe you’ll see a bit more activity from me.

Halloween is on its way so I thought it would be appropriate to make something a little bit spooky. The faint of heart may wish to not read any further, I wouldn’t want to be held responsible for spooking anybody out too much.

This little spooky ghost keyring is made from Rhododendron wood and finished with a little screw eyelet and a key ring finding that I’ve had for months but never got round to using. I gave it a very light rubbing with some Danish oil after sanding to bring out a little detail in the grain.

It was a fun little thing to make and a really easy thing to do yourself. All I did was cut out a ghost shape with a fret saw and drill three holes for the face. I then rounded it off with sandpaper. That’s all there is to it.

Craft Knife Handle

Here is something that I was given recently that I think I would like to try and emulate. It’s a wooden craft knife handle made by somebody in my local area. Very simple but effective.

Craft Knife

It’s a carved handle which secures an x-acto type craft knife blade in place within a saw cut in a piece of dowel. There is a ferrule made of gas pipe and a small screw holds it all together. After taking it apart and looking at it I think I would like to make one of my own.

I don’t have a screw to finish it off but I can make a start on the handle soon. I’m having trouble getting a work space right now but hopefully I’ll be able to get going on it this week.

Wooden Flower

Over the bank holiday weekend I decided to finally get myself into gear and finish off a little project that I started ages ago.

I have decided for the time being to focus my carving efforts on making wooden flowers of different types. This is my first attempt at it.

Wood Flower


The flower and the base are made from a poplar stick I had in the garage and the stem is a reed from a reed diffuser type air freshener. I painted it with acrylics and gave it a finish with some Plasti-kote spray varnish.

I’m not entirely dissatisfied with how it turned out. It’s clearly recognisable as a flower at least. The paint job is a little bit thick and amateurish but wood finishing is a mysterious arcane art of which I haven’t even grasped the basics.

I plan to make more flowers over the summer of various types. I quite like that this pattern can be made from a stick so I’ll probably try some different designs made in a similar way. I have a few that are best made from cut timber as well so if I can fight off my natural laziness I should have quite a few things to share over the summer.

Old Project: Wood Spirit

You’ve all seen the Owl I made on Christmas Eve so I thought I’d share the first couple of carvings I made. A wood-spirit and a moai head.

Wood spirits are a very common carving project that usually takes the form of an old man with a long beard. I made mine from a stick of Alder I got from work. I suppose I was jumping in at the deep end with my choice of material somewhat. Most first time carvers are encouraged to use very soft and easily worked woods such as Basswood. Jumping straight in using found wood probably made things harder than they perhaps could have been but it was a rewarding experience.

I used a series of Youtube videos as a guide while making the wood-spirit. They’re well worth watching even if you don’t want to take up carving yourself. You can watch the videos here and here.

The maoi head was slightly different. I carved it from memory from a stick I found in the park. As you can see my memory was clearly a little hazy because it’s not a very accurate representation of a moai. Much of what I learned from carving the wood-spirit went into this project, especially the eyes and the nose. I used the same technique on both carvings.

It’s been over a year since I made these and I’d like to say I’ve come a long way but I haven’t. I simply haven’t made enough stuff to have improved by an appreciable amount. That should be a goal for 2013, make more stuff. At the very least a more accurate moai head should be on the cards.

Old Project: Spoon

Here’s something I did in the autumn that I don’t think I posted about on my old blog. With more of the poplar I have in the garage, I made a little wooden spoon.

Of all the things I’ve tried to make so far I think utensils are my favourite. This is the 3rd spoon I’ve made and I think it’s probably the best. I quite like my previous effort, a Rhododendron tea scoop but it wasn’t the most practical design.

It’s made from Poplar and finished with walnut oil. Even though I don’t intend to use this spoon I wanted to try a food-safe finish. Walnut oil is a pretty popular way of finishing utensils, though obviously it’s not suitable for people with nut allergies. An alternative would have been raw linseed or it’s vastly more expensive health-food shop equivalent, flax oil.

I made this before I got my hook knife (which I still haven’t used) so I carved the bowl out with the bent shallow gouge that came with my Henry Taylor palm tool set. I did the inside of the bowl after roughing the outside because I just don’t feel confident enough to do the inside first like some people do. I think my next spoon will be a large cooking spoon if I can get a nice log of something a bit sturdier. Poplar just isn’t durable enough to use for utensils.